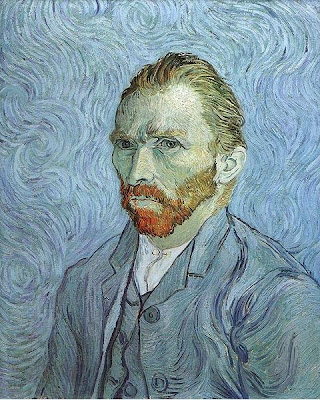
Thursday, July 31, 2008

Oil Painting Demonstration -- Clew Bay Part II

Oil Painting Demonstration - Irish Landscape
As promised, here is the follow on from the initial sketch Part I for this painting of Clew Bay, which I am working on at the moment.

Painting the Undercoat
The above shows the initial undercoating - the main purpose at this stage is to establish the main colour features for all elements. For the sky, I mixed manganese blue with titanium white and used a number 1 hog hair filbert brush to work in the cloud shapes. I varied the mix proportions to get darker or lighter shadows as necessary. For the mountains I mixed ultramarine blue with the same white for the cloud shadows, and the same blue with white and raw umber (very small amount) to create the grey of the mountains. If the grey turns out correctly mixed, it should have a slight blue feel.
.
Mixing Green in Landscape Painting
There are a lot of colour combinations to explain in the above, so this is a bit more of an instinctive painting than the last demonstration of painting a snow scene. The main thing about painting landscapes is to avoid having too much of one shade or colour green. This happens a lot for beginners. I try always to avoid this, having areas of similar green too much. Every area of the painting should have some variety. Our eyes are very sensitive to shades in the green spectrum so we can recognise a large amount of different shades. Mixing blues and yellows creates various greens, but knowing what you are doing to get a certain shade comes from knowing the places of the colours you are mixing on the colour wheel.

In the above, and the following pictures I mixed greens as follows:

For darker dull area greens, ultramarine blue with cadium yellow.
For very dark areas, increase the ultramarine blue in the above mix or include viridian green.

For medium bright greens, ultramarine blue with lemon yellow or cobalt blue with cadmium yellow, manganese blue with cadium yellow.

For bright vivid greens, manganese blue with lemon yellow.

To desaturate the colour of a mix, include the opposite colour on the colour wheel to neutralise down the hue. For example, add a hint of cadmium red or permanent rose, very very tiny amount.

I didn't use really bright greens so much in the painting, as they are not needed. Distance also reduces the greens intensity. As a green recedes into the distance it will lose the yellow component and the blue component becomes more obvious. So don't include too much yellow on it's own in the distant parts. It will ruin the aerial perspective effect. Remember warm colours advance, cool colours recede.
.
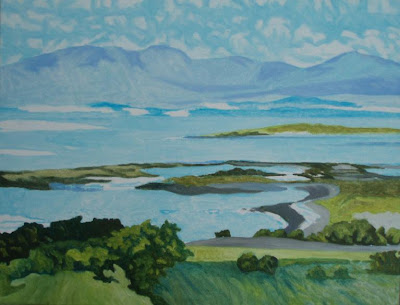
For the grey of the beach areas, you can use a combination of ultramarine blue with raw umber, or cobalt blue with raw umber. The grey can be lightened with titanium white. It's also good to try varying colours away from what you see in the photo. I tried a little area of more purple shade on some beach areas, using ultramarine blue with raw umber.
The water is similar to the sky, and is just a light coat of paint, using manganese blue and white.

I tried to cover the whole canvas with paint at this underpainting stage to remove the white glow of the gesso. This makes it easier to see colour and light balance as I progress on to the final painting. Below is where things are at the end of underpainting. If you are enjoying this demonstration be sure to check back during the next week, as I complete this picture.

Wednesday, July 30, 2008

Previous Work - Oil Painting

Freedom - Detail

This is a painting I remember working on in my grandmothers old farmhouse, quite some years ago. I finished it at a slower pace than work I have done recently - not sure if faster is better. Still think about that from time to time. I used to spend a lot of time on some paintings, to get them really perfect. I often felt it was worth it. But on reflection, it really was too intense perhaps.


To a child dancing in the wind
Dance there upon the shore,
What need have you to care,
For winds or waters roar,
And tumble out your hair,
That the salt drops have wet,
Being young you have not known,
The fool's triumph nor yet,
Love lost as soon as won,
Nor the best labourer dead,
And all the sheaves to bind
What need have you to dread,
The monstrous crying of the wind.
.
William Butler Yeats. 1865-1939
.
I have omitted the second verse...not as nice as above.

Tuesday, July 29, 2008

Oil Painting Demonstration -- Clew Bay


This is the latest oil painting subject, Clew Bay. I have only just started this and hopefully I will be able to work on it over the next week or so, time permitting. The view is from the beginning of the route up Croagh Patrick, looking north across Clew Bay. In the above, I have sketched the initial scene in cobalt blue as accurately as I could. No I didn't trace!! I just took my time to get everything in the right place! I'm not including the buildings or car-park. I'm using a bit of artistic licence here. Also looks like a big thumbprint on my camera lens, will need to clean it!

Actually last Sunday was the annual pilgrimage up Croagh Patrick and several hundred if not a thousand or more people made the difficult trek to the summit. For the very first time ever, the Irish television network, RTE hauled cables and power and everything up the steep side of this mountain, (quite an effort as it took some days to do this) to allow them broadcast a Mass from the top of the mountain. This happened last Sunday at 10 am.

I climbed the mountain several years ago, with weather similar to the above photo. The view from the top is spectacular and you can see very distant parts of Mayo and down to Clare. The top is flat about the size of a football field but the north slope starts abruptly and is very steep. It is broken rock and scree and impossible to gain a hold on. If you descend onto it from the top, you will just keep sliding painfully down. The route up involves skirting left of this as you climb from the north and reaching the back of the mountain where it is not so bad. There are some sections of scree to climb past however and your foot sinks in among the small stones as you try to ascend. Some pilgrims climb barefoot!! Ouch!! The mountain is known for it's almost exact pyramidal shape, quite unique. Click here, Croagh Patrick to see a painting I did of this mountain from a beach which is to the north west, looking towards it. This was from a slide I took the weekend of my ascent.

Anyway, if people are interested in seeing the progress of this painting, check back to the blog from time to time over the next while... Should be some progress unless I get real busy.
Also, I hope to include a few articles on mixing colours in the blog. Mixing mauves, blues, greens or browns, etc for that just right shade. So sometime soon, I'll get around to that.

If interested, see earlier step by step snow scene painting demonstration.
Tomorrow I think it's time for the poetry corner...

Monday, July 28, 2008

Complementary Colour Scheme, Part IV of a Series


Complimentary Colour Schemes

Complementary colour schemes are easy to use and are very useful for creating highlights or areas of interest within a painting. They involve using two colours that are directly opposite each other on the colour wheel. The primary colour compliments are as follows:

Red -- Green
Blue -- Orange
Yellow -- Purple

Of course there are many ways to increase the variety of the system. A tint of a colour (that colour mixed with white) or a shade of a colour (the colour mixed with black) can be used in the scheme. Pink is a tint of red, and goes with light greens with nice effect. Imagine sweet pea against light green leaves. The photo above, courtesy of http://www.wetcanvas.com/ illustrates the combination of these colours. Complimentary colour schemes usually have one colour as the main or dominant and the other as the focal point or subordinant colour. The sparing use of the non-dominant colour allows the eye to immediately travel to the location where it is placed. If the complimentary colours are beside each other and both of intense value, then a high contrast can be created. This colour scheme by it's very nature creates such high contrast situations.

The photo below of geraniums is another example, red being the focal point, amid a more plentiful green background. Variety occurs from all the tints and shades present among the colours, and also there are slighty different tones of red or green, if examined closely. The intensity of the red, amid the complimentary green which is more muted in intensity, ensures the flower heads are where the eye is drawn.

Generally, the best effects occur where one of the colours is warm and the other is cool, blue and orange. Here is another example from VanGogh. Cafe in Arles at night. I have included two slightly different versions to illustrate the effect of colour intensity. Which do you prefer? The variation in intensity certainly alters the scene.


That's it for now. To see previous information regarding colour here are the links, monochromatic and analagous colour scheme, mixing neutral and semi-neutral colours, choosing a palette for painting. Enjoy exploring this ever-growing blog of art information, and my paintings too! You can see my next step-by step demonstration coming online over the next two weeks, so be sure to check in as I progress it. And if you like my art, be sure to share the blog with others. Thanks.

Saturday, July 26, 2008

Oil Painting - Work from Last Year.


This was a painting I completed last summer. It is oil on canvas, 18"x 14", of a rapeseed field with a cherry tree. Last year I worked in the countryside, where there were many such fields. It was around this time that I began reading a lot about getting the intensity and values right in paintings. I still feel I have a lot to learn and there are a lot of things I can experiment with in increasing my knowledge of these. At the moment I am just enjoying each painting I do as a test in itself of increasing my ability, and trying not to get too over-whelmed at how much there is to learn. Value and colour intensity are really the most important aspects of painting.
The blog is short today as it's weekend and I have a lot of other things to do. Hope to post again during the week.

Friday, July 25, 2008

Art - The Good, the Bad and the Marketing


Cygnets Day Out, Oil on Canvas 16"x20"

Competition in the art world to stand out from the crowd is intense. In fact, we are living in an age where it is estimated that more people are alive today than have ever died. With the increase in spare time and availability of artists materials at reasonable cost, there are more people trying their hand at producing art than ever before. Most people experience a lot of personal enjoyment from being creative. Art is a great way of expressing yourself and can be relaxing. But not everything that is created for sale is necessarily worthy of it's asking price.

I am talking here mostly about non-representational work. Where non-representational work is selling for a high price - the blob on a canvas type of work, many elements come into play: contacts, good business sense, clever marketing, luck and "schmooze factor". I guess there is a place for non-representational type of work if it's not overpriced, but I much prefer to see representational work, in any style, from ultra-realism to semi-abstract, executed well.

More often than not, average talent results in average results, getting you recognised in a small circle, among your family and friends. You may even sell the occasional painting. To move beyond this circle, you have to find a niche and stick with it until you reach an adequate level. It may be possible to succeed to an extent with questionable work, by becoming business savvy, using marketing skills and learning "Artspeak". However, if you are true to the task of becoming a respected artist, it's infinitely better to strive to improve to that level where your talent begins to speak for itself. Of course, you'll still need the marketing but it will be easier.

Detailed View

I agree with the opinion of Robert Bateman Canadian wildlife artist when he talks about striving to avoid the easy route of producing what he would call average work. It's much more rewarding to be as talented an artist as you can be. The work will better sell itself and if it doesn't, you have the satisfaction that you are being true to your artistic dream and striving to do your best at that moment in time. Good work will be appreciated for it's own merits and not because people think it must be worth a lot, because someone put a big sticker on it. Genuinely good original art will stand the test of time. So for that reason, I believe it is important to learn technique as much as possible and always try to improve, both technically and creatively.

For another take on this topic with reference to the fabulous work of an accomplished artist like Robert Bateman take a look at the following article by A Crazy Canadian. which I stumbled across.

Wednesday, July 23, 2008

Snowscene - Landscape Oil Painting Demonstration Final Part


Snowy Track - Oil Painting Demonstration Part I , Part II and Part III.
 
First I wish to show my latest art design collection.

My Art Designs are on clothes for sale. Visit http://shopvida.com/collections/voices/jim-shanahan to purchase beautiful designs of my art on clothing. Beautiful flower designs and others on scarfs and tops. Enjoy and have a chance to buy a unique item - not available anywhere else or in shops, created by me!!
 
Now back to the painting.
The snowy track painting is finished! I finished it last night, and it took about two more hours to do so. The above photo shows the completed work. In short, I didn't have so much left to complete. I painted the white snow area again in entirety with titanium white, to brighten any dull sections, taking care to leave the shadows intact. I painted in the strands of fencing wire, using a mix of raw umber, ultramarine blue and white to achieve the correct grey colour.
.


Then all I had left to do was the tree. This took a solid hour of careful work. I used a mix of raw umber, titanium white and slight amount of ultramarine blue to paint the main branches in a grey. I went over these branches slightly using a browner mix. Raw umber with titanium white without the ultramarine blue achieved this. I used a slight amount of venetian red, mixed with the raw umber for the furthest branches where they really get small, but being careful to not let it get too red. As I described in my section on drawing, I compared the distances between all the elements of the tree branches to draw each part. I also constantly stood back to look at the overall shape the tree was forming. I didn't want it too big or out of shape. Also I drew a smaller tree below left of the larger tree. After the brown of the trees was looking about right, I did the very last part. Really enjoyed this bit! Putting on the snow on the horizontal branches. It really completed the tree.


Detailed view of tree
Then I had a look over the whole painting to check if I needed to do any more. There was a slight amount of touching up, tweaking of minor elements, such as redefining fence posts more clearly, lightening the mountain in distance and lightening the blue track slightly. Then it was ready to sign. I'm fairly happy with the way this turned out. If you like it feel free to hit the comment button and let me know. I enjoy to hear feedback, good or bad!

Tuesday, July 22, 2008

Winter Sun in New Jersey

Winter Sunlight in New Jersey
.
Oil Painting - Recent Work
This is a painting of the area around Watchung, New Jersey. I painted this in January. It is in oils on canvas, dimensions, 10" x 14". It is available for sale. If interested contact Jimsartemail@hotmail.com
.
From doing the poetry corner I realise, an awful lot of poems seem wistful or melancholy. Here's another to add to that pile. I hope it doesn't depress anyone too much!!
.
Fading-leaf and Fallen-leaf
.
Said fading-leaf to fallen-leaf,
I toss alone on a forsaken tree,
That rocks and cracks with every gust that racks
It's straining bulk, say how is it with thee?
.
Said fallen-leaf to fading-leaf,
A heavy foot went by an hour ago,
Crush'd into clay, I stain the way,
The loud wind calls me, and I can not go.
.
Said fading-leaf to fallen-leaf,
Death lessons life, a ghost is ever wise.
Teach me a way, to live till May,
Laughs fair with fragrant lips and loving eyes.

Said fallen-leaf to fading-leaf,
Hast loved fair eyes and lips of gentle breath?
Fade then and fall, thou hast had all,
That life can give, Ask somewhat now of death.

By Richard Garnett (1835-1906)

With regard to an earlier poem, "The road less traveled" I have included an update to that poem's post by adding a new link to that post, pointing to an artists thoughts about that poem and how it applies to artists. Still with me, click "The road less traveled" to see it.

Also I was reading about an emerging artist from Alabama, who is just starting to make a name for himself in the world of art, at the ripe old age of 112, yep, you heard it right, 112!! I wonder does he still have his banjo?

Monday, July 21, 2008

Snowscene - Landscape Oil Painting Demonstration Part III

This is a continuation of the Oil Painting Demonstration Part II which I showed last week. Here is Part I of the Painting Demonstration.

Having completed the "undercoat" last week, and allowing it to dry, I now wanted to go over the entire picture, increasing and refining the detail where necessary. Much of the work I am doing in this stage will be harder to see, between photos but it is there if you look closely. Sometimes it's just an additional layer of paint to reinforce the colour where it was patchy, in other cases you can see more detail added. Compare the photos carefully to see the gradual changes.

I am using a combination of a flat hog hair brush size 2 for larger areas and a small sable brush, similar to a small watercolour brush for more accuracy. In the above I began with the sky. I used manganese blue and titanium white for the blue of the sky. I repainted this sky surrounding the cloud. I would not mix the manganese blue and white so much on the palette but rather add tiny amounts to the area of the canvas and blend it in. Just below the cloud to the left I would add the blue and blend it downwards and above the horizon to the left I added white and blended it up. In the deeper upper blue area, I mixed it on the palette first.

I also started some reworking of the clouds. I used ultramarine blue with white, varying amounts to create shadow intensity. Some very small amount (barely a hint) of raw umber was added to the mix, for to create a darker shadow in places.

The next photo above, shows more reworking of the cloud. To explain exactly what I am doing is difficult, but I am only using the three colours, ultramarine blue, titanium white and tiniest, almost unnoticeable amount of raw umber. I use my own instinct and natural brushstroke to define the cloud in a more realistic way. I also went back over the cloud just above the horizon and deepened the colour.

Between this photo and the previous, I also worked on the snow to the right of the painting. Using a small brush I painted the shadows in the distance snow using a mix of cobalt blue and manganese blue. I tried to paint them with a fairly dry brushstroke and intend to blend them in later. I painted another layer of white on the white snow areas, trying to further define the shapes of the fence posts. I also used a combination of various lighter and darker mixes of cobalt blue and manganese blue to create variety in the shadows on the right foreground snow. In some lighter snow areas I used manganese blue mixed with white only.
.
Using all the colours I mentioned previously I have continued to improve the shadows on the snow. I painted the fence shadows in the central snow area and using a clean dry brush (size medium) I smoothed out the shadows on the distant snow at the right, blending them down. For a section of snow shadows to the right of the left side fence posts, I used only ultramarine blue and white mixed. On the right foreground I darkened the shadow slightly by infilling some lighter areas with manganese blue mixed with slight amount of cobalt blue. For the darker areas this is nearly all cobalt blue. The area on the right was beginning to look very different from the rest of the foreground and in the next photo I repainted the middle and left foreground in a similar fashion to rectify this. The painting now has a slightly darker foreground but one with much more shadow and colour variations than before. Hopefully, a more interesting foreground but I have to be careful about overworking the painting now, as I have already lost some of the spontaneous feel of the undercoat painting.

The painting is almost complete except for to put in the tree, fence wire and some slight further refinement of shadows, and perhaps brighten the white snow. Depending on how the foreground looks at that stage, I might try a glaze to lighten it a little if it feels to dark, but that depends on the overall feeling of balance. I will have to wait and see. I shall post again on the final stage of the painting soon. But that's it for today. All feed back will be read with interest...so feel free to comment.

Saturday, July 19, 2008

Landscape Art Painting Blog -- One Month Old...

Clew Bay, Connemara, Ireland

The blog is one month old and according to statistic's most blogs crumble back into hyperspace after three months! Where will this blog be in two more months time? You'll just have to watch this space. As for me, I'm taking the one day at a time approach. One thing is, I seem to be doing more painting than I would if I hadn't the blog.

Today being the weekend, I'm going to be busy, but will manage to fit in some time for painting, hopefully. So look over the next days or so for some update on the snowscene oil painting demonstration, which I started last week.

I've been checking on the searches and the blog is on the second page consistently under searches for Irish Landscape Art, and has received a few visits that way. Therefore I may concentrate on some Irish Landscape over the next while to see if I can jump up to the first page. On that note, the above photo is Clew Bay and it's taken from the beginning of the way up to Croagh Patrick, (Ireland's holy mountain where St. Patrick climbed). I did the climb by this route some years ago. This photo shows what I mean by the changing light in Ireland. Look at the clouds in the sky, no plain blue sky here that never changes! I am considering to paint this as my next project after the snow scene, so if you like oil painting demonstrations, this is the place to be . This photo is free use from http://www.wetcanvas.com/ image library.
Some interesting searches have already got the blog on the first page, so the blog is finding a niche to some degree...

Friday, July 18, 2008

The Life of Vincent Van Gogh - Art History


Vincent Van Gogh
If Vincent Van Gogh had been alive today, he would probably have one of the largest blogs on the net. Not sure if it would be popular, considering his state of mind. During his brief life, a mere 37 years, he wrote 18 years of letters to his brother Theo alone, not to mention other relatives and friends. He is generally regarded as the most important painter since Rembrandt, influencing greatly the modern expressionist movements. He has achieved mythological status in the public imagination due to fitting the mould of the starving tortured artist.

Vincent was born on 30th March 1853 in Groot - Zundert in the Netherlands, eldest of six, his father was a protestant pastor. His brother Theo was born on 1st May 1857. Vincent attended boarding school as a child from 1864-68, before returning to his parents in Zundert. He was solitary by nature, often spending time in the open countryside near his hometown. In 1869 he started work as a junior clerk for the art firm of Goupil and Co. in the Hague, where he uncle was a partner. In 1873 he was transferred to it's London branch. While there, he lodged with Sarah Loyer and he fell in love with her daughter, Eugenie. However, after declaring love out of the blue one day to her after several months of living in the house, he was rebuked with vigour as she told him she was engaged to a man who was working at sea, and she was waiting for his return. Vincent took it badly and returned to Holland for 3 weeks and was then moved to the Paris branch of Goupils temporarily much to his dislike. In 1875, he was temporarily returned to the London branch before being permanently assigned to Paris. In 1876, he was let go from Paris due to the inefficient manner of his work, and he decided to return to England. After his rebuke in London, he had become increasingly solitary. He began to seek work as an elementary teacher and taught basic french, english and mathematics in schools in Ramsgate and Isleworth. He also took the notion to help in the local parish and sometimes preached there as a lay minister. In 1877 he returned to Holland, worked for a while in a bookshop and took a brief study in theology in Amsterdam, before quitting in 1878 to study at a school for evangelists in Brussels. After clashing with them over their teachings, he returned to his parents home in Holland, before heading for the Borinage, Belgium. This was a very poor coal-mining area, where the inhabitants lived in squalor. Here, he obtained a mission post but in the winter of 1879-80 in an impassioned moment, he took it upon himself to give away all his possessions to the poor inhabitants, in a liberal interpretation of Christian teachings. He was dismissed by church authorities. This was a turning point, and the first of several spiritual crisis in his life. He continued to preach for a while but his true calling was at last becoming clear to him.

Having fallen into despair over the scandal surrounding his attempt to live a truely Christian message, he began drawing seriously for the first time in his life. He drew the people of the Borinage. As they lived in dark, dirty surroundings and always worked underground, Vincent portrayed them using a dark and sombre palette. He decided to become an artist. It was 1880, he was penniless, and he had no formal training in this new career path. Through this new venture into art, he began to rediscover his confidence, although his outlook on life remained darkened by the previous events he had experienced. He visited the Brussels Academy and studied fine art there. In 1881, he returned to where his father was pastor, then Etten, Netherlands, where he painted nature. While in Etten he fell in love with his widowed cousin Kee Vos Stricker, but she rejected his advances. He continued to study art and worked hard to improve. Working in watercolours and drawing, he found he needed to learn from others. In late 1881, he studied with Anton Mauve in the Hague, a landscape artist. In 1882 he lived in a small apartment with a prostitute called Sien and her 5 year old daughter in the Hague, and this lasted for a year. He began to paint in oils that year for the first time. In 1883 having split from Sien, he felt the need to return to nature and spent three months in Drenthe, an isolated region of northern Holland frequented by artists. After this he returned to Neunen village, where his parents were now living. In 1883 in Neunen he had a love affair with an older woman Margo Begemann, which lead to a scandal and her attempted suicide. He was to remain in Neunen for the most of 1884 and 1885. All this time he was improving as a painter. His main subjects were still-life, landscape and figures. In March of 1885 his father, Reverend Theodorus van Gogh died.
In 1886 Vincent enrolled at the Academy at Antwerp, where he studied painting and drawing. He worked from live models. During this year he became inspired by the work of Hals and Peter Paul Rubens and how they expressed mood using colour. At the same time, he discovered Japanese art prints and impressionist painting. He began to move away from his dark coloured palette and tried painting more colourfully. All the outside influences impacting on his art moved him into conflict with those he encountered at the Academy and after 3 months he left abruptly to join his brother Theo in Paris. Theo was involved in the world of art dealing. In Paris, Vincent met Henri de Toulouse-Lautrec and Paul Gauguin. In 1887, Theo introduced him to Georges Seurat and Camille Pissarro and other impressionist artists. He became friends with Camille. He painted outdoors along the banks of the Seine with Paul Signac. All the time his style was forming it's own hallmark. From spring 1886 until early 1888 his work transformed. Through the summer of 1887 his work became less traditional and more pure colour, broken brushwork and freer in all aspects. By 1888, his post-impressionist style was emerging in it's entirety. After almost two years in the city, Vincent now longed for the countryside again. In February of 1888, he left Paris and moved to Arles in the south east of France, where he could be free to paint the colours and tones of the rural landscape.

In the next 12 months in Arles, Vincent entered his first great painting period, painting sunflowers and landscapes, cherry blossoms, his friend Roulin the postman, self-portraits, other friends, views of the town, his place of lodging at the "yellow house" and everything he could see.

He was aware of how different he was from other artists in style. He wanted to persuade them to join him in Arles and start a school of painters there. He persuaded Gauguin to join him in October. For three months they worked together, but they were vastly different in temperament. Arguments were frequent as Vincent became more unstable and eccentric in personality. It came to a head on Christmas eve 1888, when after a heated argument where Vincent threatened Gauguin with a razor, Vincent cut off the lower part of his own ear and presented it to a woman named Rachel at the local brothel, with instructions to give it to Gauguin. Theo came to Arles but left with Gauguin for Paris two days later. Vincent spent two weeks in hospital.

Afterwards, Vincent recovered for a while and painted for several more weeks. He painted Self-Portrait with pipe and bandaged ear and still lifes. In April 1889, after several repeated mental disturbances he felt his sanity slipping and decided to admit himself to an asylum at Saint-Remy-de-Provence. He remained there for a further twelve months, during which he alternated between sanity and recurrences of mental instability. His world consisted of the asylum garden and his cell, but he depended on the asylum treatment to maintain his grip on reality. He painted intermittantly, trying to paint in a calmer way, to surpress his more out of control emotional style of the previous summer. He used more muted colour and replaced it with dynamic forms and vigorous line brushstrokes. He resisted painting from memory, something which Gauguin had encouraged him to do. He painted Cypresses, Olive trees and Garden of the Asylum at this time. The overall feel of the paintings produced at this time was one of sadness and struggle, but the paintings had a stronger vision than those of Arles.

Finally in May of 1890 Vincent discharged himself. He was homesick and lonely for the north of Europe and to see his brother Theo. Theo had married Johanna Bonger the previous year and they had had a son Vincent Wilhelm van Gogh in January 1890. Vincent arrived in Paris and after four days visiting Theo, he went to Auvers-sur-Oise to visit with a homeopathic doctor friend of Camille Pisarro and Paul Cezanne. This was Dr. Paul Ferdinand Gachet who began to take care of Vincent. The place was a village community similar to his parents village of Neunen, where he had not stayed for four years. Vincent felt at home and enthusiastically painted again, painting corn-fields, the village houses, the church and the town hall. Using large brushstrokes and a cooler palette, reflecting the northern climate he created very expressive works. However, his mind was still troubled. This short period of creativity ended in fights with Dr.Gachet. Vincent despaired over his sanity and his inability to succeed at his career. He also felt guilt at being financially dependent on Theo's generosity.

On July 27th in a corn field, outside of Auvers, amid feelings of helplessness of ever being cured and compounded by years of loneliness, Vincent shot himself in the stomach. He managed to crawl back to the inn, where he was staying. Two days later, with Theo by his side, he died. He was buried in Auvers.

Later that year Theo organised a small exhibition of Vincent's work in an apartment in Montmatre, Paris. But Theo's own health deteriorated and he died in Jan 1891 in the Netherlands. His remains were buried in a grave alongside his brother's grave in Auvers.

Vincent created 800 paintings and 700 drawings during the 10 years of his life as an artist. He sold only one. His life was consumed by his commitment to his art and he survived on the generosity of his brother Theo. In 1888 -1890 a few of his paintings had been exhibited at the Salons de Independents in Paris, and the same Salon in Brussels in 1890, but when he died he was essentially an unknown artist. In 1891, both Salons showed a commemorative exhibition of his work, but it was 1892 before his work was shown as a one person show. By the early 20th Century however, his work became widely accredited. The letters he wrote to Theo from 1872 onwards and to other friends and relations, provided an amazing in-depth view into his life. His hopes, despairs, views and beliefs, all are revealed in these letters. Through them the world came to know who Vincent was.

That's a long post today, but it's condensing a very long story in my own words. I shall post other articles on famous artists in future, where they are relevant to my work. I consider Van Gogh's work to be a source of inspiration to me and that is why I posted this article. If you want to read more detail of his life, why not try the book "Lust for Life" by Irving Stone. Or there or lots of other places to read about him, I'm not endorsing any!

Thursday, July 17, 2008

Art background - About my Art

As the blog has been ongoing now for just short of a month, it is likely that any regular readers have seen a number of my paintings at this stage. If you are anyway curious about the thoughts I have about my work, read on, as I attempt to answer some questions that are often asked of artists.

What do you paint and why?
I choose to paint a subject based on being drawn to some aspect of it's composition. Sometimes I am creating from my imagination and then I can include or omit what I like. When painting from observation, the subject matter has to have some element of interest, either in the play of shadows, shape of components or effect of light. Everything has to look balanced to the eye. I like outdoor scenes but occasionally paint interiors. I want to paint appealing scenes of beauty that are fleeting or are often overlooked by the casual observer.

What is your favourite brush to use?
Has to be a filbert shape, medium size (1, 2 or 3 ) hog hair brush. You can get good detail and the brush is large enough to work with at a reasonable pace.

What is your favourite material?
I prefer to work in oils on canvas. I like the richness of oil colour and the way that the paint has body and texture.

What do you mean when you say a piece has turned out really well?
If the colours are working well together, even if they are not exactly those of the original reality then I feel I have succeeded in adding a further dimension to what the original was. If I can make people see something in the image which a photo cannot convey, either through use of colour or light, then I would consider the painting a success. If the painting is a warm scene I want to create an inviting place for the viewer. If it's a cold scene I still want to show the myriad of colour that can be present in such a scene.

What do you like best about what you do?
Similar to the last question, in that if I can make people see something in the image which a photo cannot convey, then I gain enjoyment from creating the piece. When my work is going well I am filled with inspiration to create new work. I'd like people to look at my paintings and say that I have insight into use of colour and light and really see the world for what it could be.

What patterns emerge in your work?
Sometimes the swirling movements of my handwriting are evident in my looser brushstrokes.

Is there a pattern in the way you select materials? In use of colour and light?
I choose colours based on my knowledge of how they relate to each other. I want to achieve colour balance and harmony as much as possible. I also prefer to keep a sense of light moving throughout the image, and so I avoid using dark colours excessively.

What do you do differently from the way you were taught?
I am a self taught artist - for the most part.

What is your favourite colour?
I like deep blues verging on purple, although I don't use purple so much in paintings.
Deep blue is very calming! It reminds me of swimming in clear blue water.

How do you know when a painting is complete?
I know a piece is complete when no element stands out brashly, and the whole image seems to keep your eye moving around it.

What artists have inspired you?
When I work in oils I am reminded of some of my favourite artists who have inspired me - Nicholas Verrall, (http://www.catto.co.uk/) a modern day oil painter and Gustave Klimt, who also worked in that medium. I also admire the work of fantasy artist Rodney Matthews, and Vincent van Gogh. There are numerous others I admire, but these are near the top of the list.

What direction is your current work taking?
In my current work, I am experimenting with the level of detail required to convey the image. I am trying to achieve a balance between painting in a realistic approach and allowing the viewer to see brushstrokes and paint effects.

Have you any ideas for future exhibitions?
For a future exhibition I would be interested in creating a collection of images based on my current working approach, and similar subject matter. I would include a selection of landscape, outdoor garden scenes, interiors, and still-life, all with predominantly bright colour, in a slightly loose style which still remains realistic.

The above is adapted from my artist statement and turned into a question format. To see it in my original artist statement go to my website, ArtVitae.

Wednesday, July 16, 2008

Poetry Interlude - Stopping by Woods...

It's time for a break from art for today and a visit to the poetry corner. Another poem by Robert Frost, not that I particularly like his poetry but it's in the public domain. I just like poems on a case by case basis, and I like this poem. Photo courtesy of http://www.wetcanvas.com/

Stopping by woods on a snowy evening.

Whose woods these are I think I know,
His house lies in the village though,
He will not see me stopping here,
To watch his woods fill up with snow.

My little horse must think it queer,
To stop without a farmhouse near,
Between the woods and frozen lake,
The darkest evening of the year.

He gives his harness bells a shake,
To ask if there is some mistake,
The only other sounds the sweep,
Of easy wind and downy flake.

The woods are lovely, dark and deep,
But I have promises to keep,
And miles to go before I sleep,
And miles to go before I sleep.

Robert Frost
.
If you've been following the last few days landscape painting demonstration, check back over the next week where I should be able to upload the completion of this painting. It's dry now and ready for to continue on to the next stages. I just need to find the time!! Over the next while I shall be showing further demonstrations, similar to this one. For me, these type of posts are interesting, as they serve as a visual diary of my work in progress. So where possible I shall continue them.

Monday, July 14, 2008

Snow Scene - Landscape Oil Painting Demonstration Part II

Learning to paint cont'd -- Part 2

Welcome back or just welcome if you are new to my blog. First I'd like to introduce you to my etsy shop where you can buy beautiful prints of my work for yourself or they are ideal as presents for your friends if you can't think what to get them, especially as I price them at a very reasonable 10 - 14 dollars. Now on to the lesson... enjoy!

Continued from the previous day posting. Click to part 1 to see the beginning of this online painting demonstration. Above is a photo which was shown in an earlier post, obtained off http://www.wetcanvas.com/ free photo directory. I started a painting of this scene on a primed mounted canvas 12"x 16". To see a different snowscene of my art see crisp winter.


Further underpainting - Achieving the illusion of distance
Now I progressed on to the remainder of the sky using the manganese blue and titanium white as before. At this stage I am losing the sensation of a flat surface as the depth in the picture begins to take over. This is a stage I really enjoy. To further enhance the feeling of depth I deliberately keep the low sky lighter than the upper reaches and I am conscious to reduce colour contrast in the far distance and allow the greatest colour contrasts in the foreground. With this in mind I begin to work on each individual fence post. I use a smaller brush, similar to a watercolour brush, not hoghair and size 1 or so. It's personal choice on that one. I mix a small amount of raw umber with sufficient titanium white, and add a small amount of ultramarine blue, to achieve that lighter grey brown of the fence posts. Adding ultramarine also helps to balance everything in the painting. Sometimes I don't allow the mix to be complete, to create slight variations in the painting. For the darker shadows of the fence posts I omit or reduce the white in the mix. I reduce the colour contrasts in the distant fence posts. I painted the central distant hill in a grey mix, almost but not quite the same as the fence posts, being careful not to make it too dark, so as to sit back.

.


Underpainting - Middle Distance

At this stage, it is getting easier for to see what colours fit in the painting, as it is taking on an overall colour "feel". However it still looks a little lacking in balance. I want to introduce a slightly warm colour into the painting, just a hint, to stop it being too cold, colourwise. The reference photo has this in the middle distance in the shape of several bushes and shrubs. Using a small brush again I finish off the left side fence posts, before beginning these middle distance
elements. There is a small amount of hill appearing beyond the bushes and tree branches, so I complete this first in a similar manner to the central mountain, see above. For the bushes I am careful to lightly sketch their shapes and positions using a small brush and light amounts of raw umber. I pay attention to leave the spaces where snow can be seen between the bushes. For the bushes, I use venetian red, mixed with and dominated by raw umber. To darken the overall mix, I add some portions of ultramarine blue. I don't blend everything into a single shade but try to keep variety of shade in the bushes structure. I refer to the photo to paint the areas lighter or darker as necessary, using no ultramarine in the lighter areas.


End of Underpainting - Final Cleaning Up
In this stage, it remained to go back over the painting and search for obvious flaws, areas of no paint and other problems such as inital sketch showing through. I finished the central bush completely, repainted the shadows cast by the fence posts, using a smaller brush than the original hog hair, and covered the area of the sky where the tree had been sketched. The sketch drawing was showing through and I didn't need it as I intended to draw the tree in after the sky was dry. I also used a dry brush to smooth out the brushstrokes throughout the painting. I cleaned the brush before moving to areas of different colours. Using a small brush I painted snow up to the edges of all fence posts. Then I left the painting to dry.


I called this the underpainting stage, and it is, but depending on how well it has worked, much of the underpainting may suffice for the final painting. I will include further follow-up posts, to show the continuation of this "work in progress", in the near future, so check back to see that.


I may replace the last photo above with another as it was taken outside in evening light, but all the other photos were taken outside in daylight. The colours appear slightly dulled from the actual painting.


That's it for now and hope you enjoy these on-line demonstrations. All feedback is welcome, so feel free to post a comment.

Sunday, July 13, 2008

How to Oil Paint-- Art Classes -- Snow scene - Landscape Paintings Oil Demonstration


Welcome back or just welcome if you are new to my blog. I'd like to introduce you to my etsy shop where you can buy beautiful prints of my work for yourself or they are ideal as presents for your friends if you can't think what to get them, especially as I price them at a very reasonable 10 - 14 dollars. Now on to the lesson... enjoy!

Learning to paint
One of the aims of this blog is to provide some insight into painting. So as promised in previous posts, I intend to show step-by-step demonstrations of work in progress. Above is a photo which was shown in an earlier post, obtained off http://www.wetcanvas.com/ free photo directory. I started a painting of this scene on a primed mounted canvas 12"x 16".


Getting started - The initial composition
Using a number 2 hog-hair filbert brush, I created the inital sketch of the scene. I drew out the fence posts in raw sienna, and all the other elements in cobalt blue. For medium, I used a small amount of "Sansodor", (this is a slow-evaporating white spirit). As much as possible, I try to get every element in the correct position at this stage. It saves a lot of time later, if you can always strive to "get it right first time", or get as close to right as possible. As I draw, I check each fence post position and other lines I create, to see their postion in the overall scene is correct. I also stand back and look at the size of the "negative spaces" that are being formed and their shape. I am careful to avoid straight lines in any part of the drawing, except the fence posts. Straight lines rarely occur in nature, and create an unnatural look. Although I used raw sienna here, if I was drawing it again, I would use cobalt blue on the shape of the tree, as this was protruding into the sky and created a problem with overpainting later. I drew some not so definite lines to show where the cloud shapes would be.

Underpainting - Choosing the colours.
When I looked at the photo I could see that the snow blue is much darker than the sky blue. On the colour wheel we have ultramarine, cobalt blue, pthalo blue, cerulean blue and manganese blue to choose from. I don't list prussian blue as it is a somewhat neutralised version of pthalo blue and lies inside the colour wheel circle. Ultramarine is too dark I felt, and lies next to purple shades, so I decided to try using lighter blues, cobalt or pthalo. I didn't have pthalo blue but I had cobalt and manganese. I decided to try creating a shade midway between these for the snow foreground, so mixed these in 50:50 proportion. Looking at my photo below, there is some different shades created in the blue of the snow foreground. Darker parts contain more cobalt, and lighter parts a slight addition of titanium white to the 50:50 mix. I don't like to use flake white as it contains lead. So using these combinations and a no.1 flat hog hair brush, I painted the foreground in a reasonable amount of detail, but not extreme detail. I tried to create smooth brushstrokes and avoid ridging of the paint. Later when dry I can overpaint a glaze to reduce some of the intensity of these colours. At this stage I want to continue covering in all areas of the white canvas as soon as possible, but also trying to get the balance of colours close to what is needed. Removing the white of the gessoed canvas allows an easier interpretation of the way forward, as the plain white can throw you off easily. So I also paint the white snow areas beyond the foreground shadow on up to the horizon. In doing this, I include some slight blue shading on the snow surface, using the same shades as before.


Underpainting continued - Painting a sky in oilsPainting the sky, I need a very light colour blue for the areas of the sky close to the horizon. I also need to increase the intensity of this shade in the higher parts of the sky. I'm not talking about cloud here, just the sky. For this I use my manganese blue with titianium white to lighten it. This is initial underpainting, but I try to smooth out the brush strokes. All painting to this stage has used the same no.1 flat hoghair brush. One thing I try to avoid is dabbing. By this I mean, you've put the paint on the canvas, then you spend ages trying to spread it further. It's so much easier and quicker just to get more paint. I tend to do two to three brushstrokes maximum before reloading the brush. I won't go into how to load the brush correctly here, but will write an article on that at a later stage. Now, on to the clouds. Here I am using a mixture of ultramarine with some titanium white, interspersed with varying amounts of cobalt blue. It's very much an instinctive approach to creating the various lights, darks and shapes needed. As I paint the cloud I am also drawing it's shape out, and leaving the occasional space for the lighter sky to show through.

I have to leave everyone hanging on a limb now, but check back tomorrow and see the continuation of this online oil painting demonstration...which will continue to the stage shown below. Still not finished! I hope you are enjoying it and feel free to comment. Check here for my ebay auction also.

Saturday, July 12, 2008

Oil Painting...New Work

Deer foraging by lakeside.
The above oil painting is new work, just completed and is for sale. If interested email Jimsartemail@hotmail.com The work is oils on canvas, measuring 16" x 12". I am interested in feedback so feel free to leave comments. Enjoy it, and check again for more paintings and articles. Check here also for my ebay auction.

Friday, July 11, 2008

Landscape Paintings - Reference Photos for Painting


Firstly, here is the link to My Etsy Shop - please feel free to visit, where you can buy prints of some of my favourite paintings.

Also see my Art Designs on clothes for sale. Visit http://shopvida.com/collections/voices/jim-shanahan to purchase beautiful designs of my art on clothing. Beautiful flower designs and others on scarfs and tops. Enjoy and have a chance to buy a unique item - not available anywhere else or in shops, created by me!!
 
Also today, here are some reference photos I pulled off http://www.wetcanvas.com/ which I felt were worth a second glance. Wet canvas has a large stock of reference photos and I intend to use the occasional one. I hope to go through some of the numerous photos I took myself over the years and given time I want to create some sort of art reference database of my own.

Technology is wonderful! Digital photography has really freed up a lot of the time needed to gather reference material. Of course, there is always the Plein air approach, something I never really tried, due to the unpredictable climate we have here in Ireland. Actually, to be honest, we don't have a climate, we just get weather, and lot's of it!! You never know what it's going to do next. Not sure what day summer is on this year, but will make the most of it.


One good thing about the constantly changing weather is the variety of light conditions we get here in the Emerald Isle. This is especially noticeable on the western seaboard. Many artists are captivated by the way cloud and sun combine here, often in very dramatic ways. So there is always something new to see. Have a look at some work by a famous Irish landscape artist Paul Henry, View over Lough, Slieve Mor-Achill, and Cottage in Connemara.


Seeing all these beautiful reference photos, I feel ready to start another painting, so keep checking in to see some work as I progress. And feel free to check out my ebay auction while you're here. That's it for today.

Thursday, July 10, 2008

Art School, Art Instruction -- How to make a simple frame...

View my latest ebay auction.

Art School -- Art Instruction -- Picture Framing made simple!
Some weeks ago I decided to start painting some small pictures in the style known as paint a day. Paint a day paintings are really small paintings, around 8" x 10" maximum size and are produced exactly as the name suggests with a picture everyday. To compliment these small pictures I decided to try making a frame for each one, but I didn't want to go to any large expense. Here I explain briefly how to make a light and inexpensive frame.
.
I bought two different shape lengths of timber, and glued them together as seen in the photo above. The timbers are those lightweight pine strips found in most large hardware stores. In cross section, one is square and the other was flatter and rectangular. I used six clamps to hold the strips together as the glue dried. I clamped along every foot or so of the strips. I left these to dry and set hard (a few hours at most), then I used a mitre box to cut the glued timber into four sides of the frame. The saw I used was just a handsaw but one which cut precisely and neatly. I measured the sides to correspond to the picture size, but allowing the smallest gap around the picture. This is a matter of personal choice, you can make it closer if you like. With the four sides cut out, I sanded all rough edges and glued them together. Now the tricky bit was to get the frame held in place. You definitely need a rachet clamp for this, nothing else really works, as you have to keep pressure equally on the frame from all sides simultaneously. Once that was done, I left it overnight, painted it and voila! One ready to use frame.

You can put the eyehooks for the cord in the inner sides of the back piece, instead of the back of this piece. This will allow the frame to hang flat against a wall, and not jostle about.

Here is a look at the final product, and looks quite okay for cost and time involved. Once you get used to making these simple frames, you could progress on to making more professional looking frames, as the principle is the same. You just need to invest a little more in the materials. Click Paint a Day to see the above painting up close.